The transition from playing individual melodic lines to executing synchronized, independent movements with both hands represents the most significant cognitive and physical milestone for a developing pianist. This challenge, often referred to as “hand independence,” is essentially a complex neurobiological feat. It requires the brain to process multiple streams of musical information simultaneously, frequently involving differing rhythms, articulations, and dynamic levels, while maintaining a singular, cohesive rhythmic pulse. To the uninitiated, this coordination appears to be an act of multitasking; however, from a pedagogical perspective, it is more accurately described as the automation of motor patterns within the motor cortex, allowing the conscious mind to oversee the musical structure rather than the individual finger movements.
Executing piano compositions with both hands involves the integration of several musical elements: rhythmic integrity (the precise duration of notes), vertical alignment (the synchronization of notes occurring at the same moment), and independent control of the hand’s muscular systems. Success in this area is not achieved through repetitive “trial and error” but through a structured, incremental approach that prioritizes cognitive clarity before physical execution. By understanding the relationship between the treble and bass clefs on the grand staff and mastering the subdivision of beats, a student can systematically bridge the gap between single-handed proficiency and dual-handed mastery.
Quick Summary – Playing Piano with Both Hands: To successfully play with both hands together, follow these key steps:
- Practice Hands Separately First: Learn each hand’s part on its own before combining them. Mastering one hand at a time prevents brain overload.
- Break Music into Sections: Work on small segments (even a few measures) and slowly stitch them together. This makes complex pieces more manageable.
- Slow Down the Tempo: Play very slowly at first. Use a metronome and count out loud to keep a steady beat. Slow practice builds accuracy, which leads to speed.
- Count and Focus on Rhythm: Counting each beat (and subdivision) aloud or using a metronome will synchronize your hands. Good rhythm is the glue that holds both parts together.
- Use Finger Independence Exercises: Incorporate scales, Hanon and Czerny exercises, and simple songs to strengthen each finger and improve hand independence.
- Maintain Good Posture & Stay Relaxed: Sit with proper posture, relaxed shoulders, and curved fingers. Tension can hinder coordination, so stay loose and breathe.
- Leverage Learning Tools: Take advantage of metronomes, piano learning apps, and online tutorials. These digital tools can provide guided practice and instant feedback.
- Be Patient and Consistent: Don’t rush. Start with easy songs, practice daily if possible, and increase difficulty gradually. Over time, your hands will coordinate more naturally as your brain adapts.
With these principles in mind, let’s dive deeper into each aspect of learning to play piano with both hands together.
1. Science of Piano Coordination
The primary obstacle in playing with both hands is the brain’s natural tendency to synchronize limbs in a mirror-image fashion. In neurological terms, this is often linked to “motor overflow,” where signals meant for one hand cross over to the other.
The Role of the Corpus Callosum
Piano playing significantly impacts the corpus callosum, the bundle of nerve fibers connecting the left and right hemispheres of the brain. Research suggests that long-term piano practice increases the thickness and efficiency of these fibers, facilitating faster communication between the hemispheres. This physiological change is what allows a pianist to manage the polyphony (multiple independent voices) inherent in complex music.
Creating “Automated” Subroutines
The pedagogical goal is to reach a level of “unconscious competence.” When a student practices the left hand until it can play a bass line without conscious effort, the brain frees up its “working memory” to focus on the right hand’s melody. This is why muscle memory—or more accurately, neural mapping in the motor cortex—is the cornerstone of hand independence.
2. Practice Each Hand Separately Before Combining
One of the most important strategies for hand coordination is to practice each hand on its own first. Our brains can only focus on so much at once. If you try to learn the right-hand melody and left-hand accompaniment simultaneously, you’re likely to feel overwhelmed. Instead, give your full attention to one hand at a time:
- Start with the right hand and learn its part thoroughly (notes, fingering, and rhythm). Practice it until you can play it smoothly.
- Then work on the left-hand part separately in the same way. Ensure you understand the bass notes or chords and can play the left hand fluently on its own.
By doing this, you reduce the cognitive load on your brain. As flowkey’s experts note, jumping straight into two-handed playing forces your brain to learn both parts at once, which is “a lot for anyone’s brain to handle”. Separating the tasks makes learning more efficient. It’s far better to memorize or comfortably play each hand alone before attempting hands-together.
How do you know when you’re ready to combine hands? A good test is to play each hand from memory or with eyes closed. If you can do that correctly, it means the hand is on “autopilot” enough to add the other. Once you reach this point for both hands, try slowly playing the section with both hands together. Expect it to feel like starting over – that’s normal! Treat it as a new learning phase, go slowly, and be patient as your brain adapts to coordinating the two parts.
If a piece is especially tricky, you can also practice hands separate in sections. For example, learn the right hand for just one phrase or measure and the left hand for the same segment, then put that small section together before moving on. Hands-separate practice remains a valuable tool even beyond the beginner stage whenever you face challenging passages.
3. Break the Music into Manageable Segments
Attempting to play a whole song hands-together from start to finish can be daunting. A smarter approach is to break the music into small segments and tackle them one by one. This “bite-sized” practice method helps your brain digest complex music more easily.
How to do it: Divide the piece into logical sections – for instance, 4-measure phrases, individual lines, or even just a single measure if it’s difficult. Focus on mastering one segment at a time. Within that segment:
- Play each hand separately first (as discussed above).
- Then play both hands together very slowly until the notes and rhythm lock in.
- Repeat that segment until it feels comfortable and accurate.
Only after one segment is learned should you move on to the next. When two neighboring sections are fluent, practice linking them. For example, you might play measures 1–2 together, then 3–4 together, and finally 1–4 as a continuous section. By overlapping sections in practice, you ensure smooth transitions.
This segmented approach has two big benefits: confidence and accuracy. You’ll feel a sense of achievement mastering one chunk at a time, rather than being overwhelmed by a long piece. Plus, you isolate and fix problems in each section before they snowball into bigger issues. Piano teachers often say “take it one step (or measure) at a time,” and it truly works.
Remember, even professional pianists practice difficult compositions in sections. Breaking music apart and then reassembling it is like solving a puzzle piece by piece. Over time, your brain will connect all the segments, and you’ll be able to play the entire piece with both hands seamlessly.
5. Slow Down the Tempo (Go Extra Slow!)
When learning to play with both hands, slow practice is non-negotiable. It’s common to feel impatient and want to hear the song at full speed, but resist that urge! Playing slowly and deliberately is the fastest way to build accuracy and hand coordination. In fact, slow down to speed up later is a golden rule for pianists.
Here are some guidelines for slowing down effectively:
- Use a Metronome: A metronome helps you maintain a steady, slow beat. Set it to a very low BPM (beats per minute) that feels almost uncomfortably slow. This ensures you don’t inadvertently speed up. For a beginner piece, you might start at 40–50 BPM.
- Count Out Loud: Counting “1-and-2-and-3-and-4-and” (for example) while you play forces you to keep the tempo stable. It also engages a different part of your brain, reinforcing the rhythm. If you have trouble aligning notes, count aloud each beat – it’s a simple but powerful technique to synchronize your hands.
- Aim for Accuracy First: At a slow tempo you can pay attention to playing the correct notes with both hands and landing them exactly together on each beat. If you can’t play a section accurately at a slow speed, you definitely won’t manage it fast. As one piano resource puts it: accuracy builds long-term speed. Every time you practice without rushing, you’re training your muscle memory properly.
- Gradually Increase Speed: Once you can play a passage slowly with zero mistakes, notch the metronome up a few BPM and practice at that slightly faster tempo. Over days or weeks, these small increments will accumulate. This step-by-step acceleration is how you reach performance tempo without ever sacrificing precision.
Playing slowly also helps you stay relaxed, which is crucial. You can focus on keeping your shoulders down, wrists flexible, and fingers not tense (more on posture and relaxation below). If you notice your hands “falling apart” or making errors, it’s a sign to slow back down. There’s absolutely no shame in practicing extremely slowly – even professional pianists do hands-together work at snail’s pace for difficult pieces.
6. Develop Timing with Counting and Rhythm Training
Coordinating both hands isn’t just about hitting the right notes – it’s about playing them at the right time. Often, beginners can manage each hand’s part individually but struggle to line them up rhythmically. This is why counting and rhythm training are so important in hands-together practice.
Start by breaking down the rhythms separately: look at the sheet music (or think of the melody) and identify the rhythm pattern for each hand. If the rhythms differ (e.g. quarter notes in one hand and eighth notes in the other), practice each hand’s rhythm alone first. Tap the rhythms: tap one hand’s rhythm on your lap or a table while counting beats out loud, then do the same with the other hand. This builds an understanding of how each hand’s timing works.
Next, tap both hands together (still away from the piano keys). Count out loud and try to get the hands clapping or tapping in sync with the intended rhythm pattern. For example, if the right hand plays on every beat and the left hand plays on every other beat, you might count “1 – 2 – 3 – 4” and tap left on 1 and 3, right on all four counts. Going through this kind of exercise off the keyboard simplifies the task – you’re only focusing on rhythm, not notes.
When you return to the piano, keep counting aloud as you play slowly. The goal is to make sure each note from both hands falls exactly where it should in the count. Many teachers drill the mantra: “Never skip the counting!” Solid counting will prevent common mistakes like dragging one hand behind or rushing ahead. In fact, skipping rhythm counting is one of the biggest mistakes pianists make when attempting hands-together.
Additional rhythm training tips:
- Use a Metronome with Subdivisions: Some metronome apps can accent subdivisions (like the “and” beats). This can help when one hand plays faster notes. For instance, set the metronome to click eighth notes if your left hand has eighths against right-hand quarters.
- Practice Rhythmic Variations: If you have trouble with a specific rhythm combo, simplify it. Practice both hands playing the same rhythm first (e.g., make both play quarter notes together). Then reintroduce the original rhythm. You can also try altering rhythms (swing them, etc.) as a practice tool to solidify the timing.
- Count & Clap Before Playing: A useful habit is to clap the rhythm and count aloud before you play a section. This “pre-programs” your internal clock so that when you go to the piano, your hands follow that solid pulse.
By diligently counting and training your sense of rhythm, you’ll notice your hand coordination improving. The hands will start to “agree” on when notes happen. Over time, this builds a strong foundation so you can tackle more complex rhythms (like syncopation or one hand playing triplets against the other’s duplets) with confidence.
7. Strengthen Finger Independence with Exercises
One reason playing with both hands is challenging is that each hand (and each finger) might not be equally strong or agile. Most people have a dominant hand (often the right hand for right-handed individuals), and the non-dominant hand can feel “weak” or clumsy. To combat this, pianists do finger independence exercises – basically workouts to make all fingers and both hands more equal partners.
Here are some excellent exercises and methods for building finger independence and dexterity:
- Scales and Arpeggios: Practicing scales (running up and down consecutive notes) with both hands is a classic exercise. Start with simple one-octave scales in parallel motion (both hands playing the same notes an octave apart). This reinforces equal motion and coordination. As you advance, you can try contrary motion scales (hands mirror each other in opposite directions) for an extra challenge. Arpeggios (broken chords played one note at a time) are also great – for example, play a C major chord as C-E-G-C up and down with one hand, then the other, then both together.
- Five-Finger Patterns (Pentascales): A pentascale is just the first five notes of a scale (C–D–E–F–G, for example). These are wonderful for beginners. Play a pentascale hands together ascending and descending. Then vary it: one hand louder, the other softer (to develop dynamic independence), or one legato and one staccato (to develop articulation independence). These variations train your hands to act independently in terms of volume and touch, which is a big part of hand coordination. For instance, try playing the right hand smoothly while the left hand plays short, detached notes – this is tricky but super effective practice for control.
- Hanon Exercises: The Hanon book “The Virtuoso Pianist” is a famous collection of exercises that target finger strength and independence. The exercises involve repeated patterns that both hands typically play in unison (mirroring each other). The primary goal, as stated in Hanon’s introduction, is to “instill independence and flexibility in the performing digits”. For example, Hanon Exercise No.1 has a pattern where each finger gets a workout in turn. Practicing these slowly, with strong, even strikes from each finger, will greatly improve the evenness of your playing. Even just the first 20 Hanon exercises (often recommended for beginners) can make a noticeable difference if done daily.
Hanon: The Virtuoso Pianist 60 exercices
𝄞
As an Associate I earn from qualifying purchases.
- Czerny Etudes: Carl Czerny wrote hundreds of short practice pieces (etudes) that target various technical skills. Some of his collections, like Czerny Op. 599 “Practical Method for Beginners”, contain very accessible exercises that sound musical while training your fingers. Many Czerny etudes focus on coordinating simple left-hand accompaniments with right-hand melodies, or vice versa, which is directly relevant to hands-together playing. Incorporating a few Czerny exercises into your practice can add variety and strengthen your weaker hand’s capability to keep up with the stronger one.
Czerny's The School of Velocity on Amazon !
𝄞
As an Associate I earn from qualifying purchases.
- Independence Drills: You can also invent simple drills to practice independence. For instance, hold a simple chord in the left hand (sustain it), while the right hand plays a short melody or scale – then swap roles. This teaches your hands to do separate tasks (one sustaining, one moving). Another drill is to practice crossing hands: play a note or chord with the left hand, then a higher note with the right, alternating – this isn’t common in beginner pieces, but it forces your hands to move independently.
The key with all these exercises is consistency. Just like going to the gym, you’ll want to exercise your fingers almost daily – even 10 minutes of technical exercises at the start of practice can warm up your hands and improve control. Over weeks and months, your fingers will become stronger and more agile. You’ll notice that formerly tricky hand passages start feeling easier, because each hand can carry its weight. Strong, independent fingers allow you to focus on musical expression when playing hands together, rather than simply struggling to get the notes out.
8. Maintain Proper Posture and Relaxation
You might wonder, what does posture have to do with playing with both hands? The answer: A lot. Proper piano posture and a relaxed technique set the stage for your hands to move freely and coordinate well. Tension in your shoulders, arms, or hands can severely hamper your ability to play smoothly with both hands. Thus, paying attention to posture and relaxation is essential.
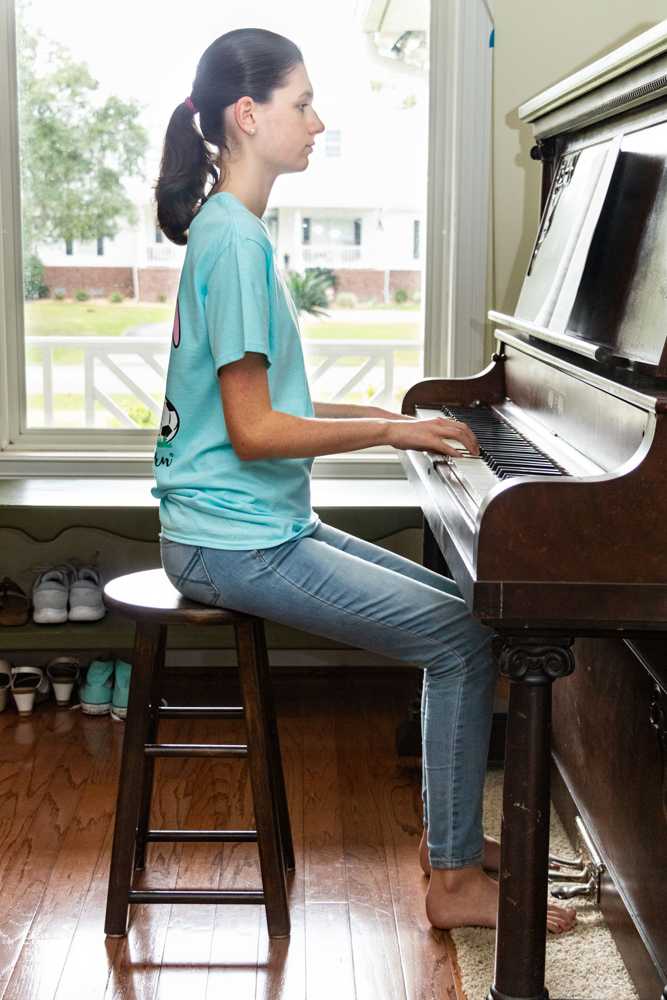
Sitting at the correct height, with relaxed shoulders, arms, and wrists, allows your hands to move independently without unnecessary strain. In the image above, notice the pianist’s straight back, level forearms, and naturally curved fingers, this position facilitates ease of motion for both hands.
Here are key posture and relaxation tips to follow:
- Sit at the Right Height and Distance: Adjust your bench so that when your fingers rest on the keys, your forearms are roughly parallel to the floor. Your elbows should be just slightly in front of your body and at about the height of the keyboard. This positioning gives you optimal leverage. Sit on the front half of the bench with both feet flat on the floor (use a footstool for children or shorter players if needed). You should be far enough that your elbows are slightly bent, not cramped against your sides, but not so far that you’re reaching for the keys.
- Keep Shoulders, Arms, and Wrists Loose: Tension is the enemy. Check that your shoulders are down and not creeping up towards your ears (a common bad habit when concentrating). Your arms should feel heavy but not rigid, elbows naturally by your sides. Wrists should be in line with your forearms – not drooping too low or cocked too high – and remain supple so they can move with your hand. A flexible wrist helps absorb shock and allows fluid hand movement, which is particularly helpful when coordinating both hands.
- Curved, Relaxed Fingers: Shape your hand as if gently holding a small ball or an egg. That slight curve in the fingers (especially the longer ones) and a relaxed thumb position will give you better control over the keys. Avoid flat, straight fingers or overly curled (tucked) fingers. Each finger should be ready to play by pressing down from the knuckle, not by poking or lifting too high. Curved fingers provide a consistent hand shape that makes playing multiple notes together easier and helps with evenness between hands.
- Avoid Over-Pressing and Straining: When playing loud or complex passages, don’t compensate by tensing up or hitting too hard. Use the weight of your arm behind your fingers rather than pure force from your fingers alone. This way, you can play strongly but still stay relaxed. If you ever feel your forearms or hands tightening, pause, shake out your arms, and reset your posture.
- Breathe and Release Tension: It sounds obvious, but many beginners unknowingly hold their breath during difficult parts! Remember to breathe steadily. On exhalations, consciously release any stiffness in your neck or shoulders. Some pianists even schedule brief “relax checks” – for example, every few minutes they’ll wiggle their fingers or roll their shoulders to ensure nothing is locking up.
- Balanced Effort Between Hands: Posture also involves how you mentally approach both hands. Don’t lean your body or shift all your focus to one hand (e.g., hunching over the right hand if it’s playing melody). Center yourself and distribute attention evenly. This balance in your upper body will reflect in how balanced your hands feel while playing.
Proper posture gives you more control, stamina, and accuracy when playing with both hands. By eliminating physical obstacles like tension or awkward positioning, you make it much easier for your brain and hands to synchronize. In short, relaxed body = relaxed hands, and relaxed hands can coordinate and respond faster. Make good posture a habit from the beginning – it will pay off immensely as you progress to more challenging two-handed music.
9. Use Digital Tools and Apps to Enhance Practice
In the digital age, learning piano doesn’t have to be a solo journey of trial-and-error. There are many tools and apps designed to help you practice more effectively – especially when it comes to coordinating both hands. Here are some useful digital aids and how to incorporate them into your practice:
- Metronome Apps: As mentioned earlier, a metronome is indispensable for keeping a steady tempo. Today, you don’t need a physical metronome; there are plenty of free apps (and even online metronomes) that do the job. Apps like Pro Metronome, Soundbrenner, or even the built-in metronome in many piano apps allow you to set precise tempos, change time signatures, and sometimes even accent certain beats. Use a metronome every time you practice hands together, gradually increasing the speed as you improve.
- Interactive Learning Apps: Consider trying a piano learning app such as flowkey, Simply Piano, Skoove, Yousician, or Piano Marvel. These apps often have guided lessons and songs that wait for you to play the correct notes, which is great for hands-separate practice. For instance, flowkey lets you practice each hand individually or together and will wait until you play the right notes. This can reinforce the habit of mastering each hand’s part. Such apps also provide real-time feedback – if one hand is off, you’ll know immediately – and many have built-in exercises for coordination.
- Rhythm and Ear Training Tools: If rhythm is a particular challenge, there are apps specifically for rhythm training. Apps like Rhythm Trainer or Beat Mirror can gamify the process of tapping in time. They can help improve your internal timing, which carries over to better hands-together synchronization. Similarly, ear training apps (like functional ear trainers) can sharpen your ability to hear when notes align or not, indirectly helping ensemble of both hands.
- Video Tutorials and Play-Alongs: Platforms like YouTube have countless step-by-step tutorials for songs, often showing Synthesia or other visualizations where keys light up. While you shouldn’t rely solely on follow-the-lights methods, these videos can be a helpful supplement to see how hands coordinate in a specific song. Additionally, some software (and digital pianos) allow you to mute one hand’s part while playing along with the other – effectively turning your practice into a duet with a “virtual partner”. This is a great intermediate step when learning a piece: you play the right hand while the app plays a guided left hand part, and vice versa.
- Recording and Playback: Don’t overlook the simple tools of recording yourself. Many digital pianos have a record function, or you can use a phone/computer to record video or audio of your practice. Recording yourself playing hands together and then listening back can reveal a lot – you might catch that your left hand was speeding up, or that certain spots consistently go out of sync. It’s like having a teacher in the room pointing out issues you might not notice in the moment. Some advanced apps even provide instant analysis of your recording (showing which notes were off-beat, etc.).
- Game-ified Practice Apps: There are apps (like Piano Maestro or Melodics) that turn practice into a game, awarding points for hitting notes in time. These can make the often repetitive process of coordination drills more fun and engaging, especially for younger learners. Just be sure to balance games with mindful practice – the goal is not just to score points, but to truly improve your skill.
Utilizing these tools can accelerate your progress. They serve as your at-home coach, keeping you accountable to rhythm and providing structured exercises. However, remember that tools are aids, not magic solutions. You’ll still need patience and perseverance. But when used wisely, technology can make the learning process more efficient and enjoyable. It’s like having a tutor, metronome, and bandmate all in one, available anytime you practice.
10. Avoid Common Mistakes When Learning Hands Together
As you work on your two-hand piano skills, be mindful of some common mistakes that can slow your progress or cause bad habits. Awareness is the first step to avoiding these pitfalls. Here are the top mistakes beginners often make – and how to fix them:
- Rushing to Play Hands Together Too Soon: It’s exciting to jump into a new song, but don’t skip the hands-separate stage. Many novices try to play both hands together right away and end up frustrated. As discussed, learn each hand well first. Trying to do everything at once often leads to sloppy playing and lots of errors.
- Ignoring Rhythm and Counting: Another big mistake is neglecting the counting. If you gloss over the rhythm (for example, not holding notes their full value or not maintaining a steady beat), the hands will never synchronize properly. Always count or use a metronome, especially when starting a piece. No matter how correct the notes are, if the timing is off, the music will fall apart.
- Practicing Too Fast (and Engraining Mistakes): Speeding up before you’re ready is a recipe for “hand trainwrecks.” If you repeatedly practice a section faster than you can handle, you’ll train in the mistakes (hesitations, mis-timed notes, etc.) and then have to unlearn them later. Fight the urge to speed. It’s far better to play slowly and accurately. Remember: if you can’t play it slowly, you can’t play it quickly either.
- Favoring One Hand (and Neglecting the Other): Often the right hand (treble) gets more attention because it usually carries the melody. Don’t treat the left hand as an afterthought – it needs just as much careful practice. Some beginners will practice the right hand diligently and barely practice the left, then wonder why the left hand can’t keep up. Devote equal practice time to your weaker hand. Sometimes even start your practice with the left hand when you’re most fresh.
- Not Isolating Trouble Spots: If there’s a specific measure where hands get out of sync, zoom in on it. Don’t always loop the whole piece from the top; spend extra time on the exact spot that trips you up. For example, maybe one chord change in the left hand consistently lags. Isolate that transition, do it slowly hands together 5-10 times perfectly, then go back to playing the piece. Targeted practice fixes issues faster than brute-force repetition of the whole song.
- Tensing Up (Physically and Mentally): Coordination problems often worsen if you tense your muscles or get anxious. Remember to apply the relaxation and posture tips. If you notice yourself gripping the piano or your shoulders tightening when a difficult part comes, stop and shake out the tension. Sometimes even exhaling on a hard passage can help your body stay loose. Mentally, stay positive, getting frustrated or saying “I can’t do this” becomes a self-fulfilling prophecy. Instead, take a breath and approach the challenge methodically (hands separate, slower, etc.) rather than brute forcing it.
- Choosing Music That’s Too Hard: This is a broader learning mistake. If you’re consistently unable to coordinate a particular piece, it might be beyond your current level. Pushing yourself is good, but jumping too far ahead leads to discouragement. It’s not a mistake to struggle – but recognize if maybe an easier song or exercise would be a better stepping stone. As one piano instructor advises, avoid music that is too hard for you, or you will quickly become frustrated with complicated rhythms, chords and other difficulties. There’s no shame in starting simple and building up.
By sidestepping these common errors, you’ll have a much smoother journey. In summary: be patient, practice smart (not just hard), and listen to what your playing is telling you. If something sounds off or feels off, analyze which of the above mistakes might be happening and adjust course. The best pianists are simply those who have learned to coach themselves through challenges with awareness and persistence.
11. Long-Term Strategies for Continuous Improvement
Mastering hands-together playing doesn’t happen overnight. It’s a gradual process that continues as you advance in piano. Here we outline some long-term strategies to keep improving your two-hand coordination over months and years:
- Consistency is Key: Aim for regular practice, even if it’s short. Practicing 20–30 minutes every day will yield better results than a single 3-hour session on the weekend. Regular exposure keeps your coordination skills sharp and reinforces muscle memory. In fact, even 15 minutes of daily practice can be more effective for hand coordination than a long weekly session. Consistency trains your brain that this is a regular skill to maintain and improve.
- Gradually Increase Difficulty: Continuously challenge yourself with pieces that are just a bit harder than the last. If you’ve comfortably learned a simple melody with left-hand chords, try a piece with a slightly more involved left-hand pattern next. For example, move from simple waltz oom-pah-pah accompaniment to an Alberti bass (broken chord pattern). Steadily increasing difficulty ensures you’re always stretching your coordination skills without leaping to something impossibly hard. This is how you expand your comfort zone.
- Revisit Fundamentals Often: Don’t abandon the exercises and techniques that helped you early on. Keep doing scales, arpeggios, and new Hanon or Czerny exercises as you progress. Each time you learn a new scale or pattern, you further solidify hand independence. Also, occasionally relearn an old piece and notice how much easier it feels now, this reinforces your sense of growth and confidence.
- Learn a Variety of Music: Each genre or style can introduce new coordination challenges. Classical pieces might teach you precision and polyphony (playing different melodies in each hand), while pop songs often improve your rhythm and groove (maybe syncopated chords in the left hand). Try some blues or boogie-woogie to get your left hand doing rhythmic riffs, or a simple Bach invention where both hands are melodic. Diverse repertoire will round out your two-hand skill set.
- Play with Others or Backing Tracks: Once you have some experience, playing duets or along with backing tracks can greatly improve timing and coordination. It forces you to keep going and align with an external beat (since you can’t just stop when playing with others). This pressure can train you to recover from slips and maintain hands-together flow. It’s also more fun and keeps you motivated to practice.
- Utilize Mental Practice: Surprisingly, you can practice hands-together away from the piano. Visualization is a powerful tool, imagine yourself playing a passage with both hands, hearing the music in your mind. Visualize which fingers play which notes in sync. This strengthens the neural pathways for coordination. Studies and anecdotal evidence suggest mental practice can make a real difference in complex motor skills (even flowkey notes that sleep and mental consolidation help “commit to muscle memory” what you’ve practiced).
- Set Goals and Be Patient: In the long run, having clear goals helps. Maybe your 3-month goal is to smoothly play a particular song with both hands, or to finish a level of a method book. Break that into weekly goals (e.g., “this week I’ll be able to play hands together up to the first chorus”). Track your progress. Celebrate small victories, like the first time you play a piece all the way through without mistakes. Understand that plateaus are normal – there will be periods where coordination doesn’t seem to improve, then suddenly something clicks. Trust the process and stay patient with yourself, as true mastery takes time.
- Rest and Reflect: Lastly, know that improvement also happens between practice sessions. Getting a good night’s sleep after practice has been shown to solidify motor skills, you may find a passage easier the next day, almost like magic. So avoid burnout: take short breaks during practice when frustrated, and occasionally take a day off. When you return, you often play better. Reflect on what’s working and what isn’t in your practice routine and adjust accordingly.
By following these strategies, you’ll keep advancing steadily. Playing with both hands will go from feeling like an “impossible trick” to something you do naturally every time you learn a new piece. In fact, down the road you might forget that it was ever a big hurdle! Stay committed, and enjoy the process of continuous improvement.
Recommended Products for Piano Students
The Virtuoso Pianist in 60 Exercises by C.L. Hanon: The definitive book for developing finger independence and strength.
Hanon: The Virtuoso Pianist 60 exercices
𝄞
As an Associate I earn from qualifying purchases.
Alfred’s Adult All-In-One Course (Level 1): A structured method that introduces coordination in a logical, step-by-step manner.
Alfred's Basic Adult All-in-One Course on Amazon !
𝄞
As an Associate I earn from qualifying purchases.
Wittner Metronome (Mechanical): Provides a clear, audible click and a visual pendulum that helps with rhythmic internalization.
Get the Classic Wittner Taktell Metronome on Amazon !
𝄞
As an Associate I earn from qualifying purchases.
Adjustable Artist Piano Bench: Maintaining the correct height is essential for proper posture and avoiding tension during HT playing.
The Best Adjustable Roland Piano Bench on Amazon !
𝄞
As an Associate I earn from qualifying purchases.
Conclusion
Developing the ability to play with both hands together is less about “brute force” practice and more about structured cognitive mapping. By respecting the durational values of each note, maintaining a consistent pulse, and utilizing the Hands-Separate protocol, any student can achieve fluid hand independence. This skill is the “gateway” to the vast world of piano literature, from the intricate counterpoint of Bach to the lush harmonies of Jazz.
The key to success is patience. Coordination is a physical manifestation of neural growth. Every slow, deliberate practice session is literally re-wiring your brain for musical excellence. Stay focused on the vertical alignment, trust the metronome, and allow your hands the time they need to learn to speak the same language.
Stay encouraged by the small wins: the first time you get through a song without stopping, or when your left hand finally keeps up with your right. Those are signs that your hard work is paying off. Also remember to enjoy the journey: use songs you love, celebrate improvements, and don’t be afraid to laugh at the occasional hand-together mishap (we all know the feeling when one hand suddenly decides to play the other’s part!).
Now, take a deep breath, place those hands on the keyboard, and try that song again – slowly, confidently, and with the knowledge that you’ve got a whole toolbox of tips to help you succeed. Happy practicing, and enjoy the beautiful music you’ll create with both hands working together!
Is it normal for my left hand to feel “dumb”?
Yes. For most, the left hand is controlled by the non-dominant hemisphere’s motor cortex. It lacks the decades of fine motor training the right hand has received through writing and daily tasks. It simply requires more repetitions to build the same level of muscle memory.
When should I start practicing with both hands?
Only after you can play each hand’s part separately, at tempo, without looking at your hands. If you are still “hunting” for notes with your eyes, your brain does not have the bandwidth to coordinate both hands.
Why does my rhythm fall apart when I put my hands together?
This is usually a result of not understanding the subdivision of the beat. If you are only counting “1, 2, 3, 4,” you are missing the “connective tissue” between the beats. Switch to counting eighth notes (“1-and-2-and…”) to stabilize the rhythm.
Should I learn the whole song one hand at a time?
No. Pedagogically, it is better to learn a small section (2-4 measures) hands-separate, then immediately put those few measures together. This keeps the musical context fresh and prevents you from becoming bored with single-hand practice.
Why is playing piano with both hands together so hard for beginners?
It’s difficult because your brain must coordinate two independent sets of movements simultaneously, something it isn’t used to doing. Each hand is performing a different part (often with distinct rhythms and notes), which challenges your brain’s processing capacity. In a way, it’s like patting your head and rubbing your stomach at the same time. This is a complex new skill, so it naturally feels hard at first. The good news is that with practice, your brain creates new connections to handle the coordination, and it does get easier.
Should I always practice each hand separately before putting them together?
Yes, especially when learning a new piece or exercise. Hands-separate practice is highly recommended in the early stages. When each hand is learned individually, you free up mental bandwidth to focus on coordination. Once you’re more experienced, there may be simple pieces you can read hands together right away. But as a beginner or whenever a piece is challenging, practicing hands alone first will make combining them much smoother. It’s a proven approach that even advanced pianists use for difficult passages.
How long does it take to get good at playing with both hands together?
It varies from person to person, but with consistent practice you can see improvements in a matter of weeks. Many beginners start to feel more comfortable after a few weeks of daily practice on basic hand coordination exercises. Generally, the first few songs are the toughest. As you continue practicing regularly, your hands will sync up more naturally. Within a couple of months, pieces that used to feel impossible will be within reach. Remember that it’s an ongoing process – even after years, pianists still encounter pieces that require hands-together practice. But rest assured, if you practice consistently (ideally daily), you’ll notice steady progress, and often “aha” moments where suddenly a coordination challenge clicks. Keep at it, and be patient with yourself.
How slow should I practice when learning a hands-together piece?
There is truly no such thing as “too slow” in the beginning. Start at a tempo where you can play the piece correctly and in time, even if that means an incredibly slow pace. The priority is accuracy and coordination, not speed. Once you can play it perfectly at a slow tempo, you can very gradually increase the speed. A good benchmark: if you’re playing with no hesitations and both hands are aligning well, you’re at the right practice tempo. The moment things fall apart, slow back down. It might feel tedious to go ultra-slow, but it’s the fastest way to build clean technique. In short, never rush, speed will come on its own after you build a solid foundation of synchronized, confident playing
Sources & References
Sources & References
This guide on piano coordination and hand independence has been developed with a focus on pedagogical precision and neurological accuracy, cross-referenced with the following academic and instructional resources:
Creative Commons / Anonymous. Music Theory v. 1.0. (CC BY-NC-SA 3.0). Utilized for the structural analysis of “Texture Types,” particularly the transition from homophony to complex polyphony.
Martin, Lawrence. Basic Music Theory for Adult Beginner-Level Piano Players (Piano Syllabus). Lakeside Press. This text provided the foundational framework for “vertical alignment” on the grand staff and the strategy of “hands-separate” practice specifically tailored for the adult cognitive profile.
Feezell, Mark. Music Theory Fundamentals (High-Yield Music Theory, Vol. 1). LearnMusicTheory.net. Referenced for the technical breakdown of Rhythmic Subdivision (Appendix 2: Rhythmic Counting Syllables) and the definition of Polyphonic Texture (Section 5.8), which is essential for managing independent musical voices.
Pilhofer, Michael & Day, Holly. Music Theory For Dummies. Wiley Publishing, Inc. This source was consulted for the “Multitasking vs. Automation” theory, emphasizing the role of the motor cortex in developing muscle memory and the use of metronomes for rhythmic stabilization.
Hanon, Charles-Louis. The Virtuoso Pianist in 60 Exercises. The definitive source for finger independence drills. The article’s focus on “instilling independence and flexibility in the performing digits” is directly derived from Hanon’s original pedagogical intentions.
Czerny, Carl. Practical Method for Beginners, Op. 599. Referenced for the use of progressive etudes to bridge the gap between single-hand scales and dual-hand coordination.
Last updated April 3, 2026